 BRIDGE1

By the end, you’ll have asked a local model to write a one-page website for a made-up reading club, checked its edits yourself and summarized your own notes. You’ll practice checking what a coding agent changes in real files on your Mac, while your prompts and outputs stay on your device when the model runs locally.
OpenCode is the client you type to, and its coding agent can read and change files as well as answer questions. The model supplies those answers. Here you’ll use OpenCode in Terminal, a window for typing commands, and give it requests in plain words, called prompts. Bridge1 connects the client to a model running locally on your Mac.
Coding is the focus of this guide, but you can also give the client small jobs with notes, plans and documents. Set it up with the steps below first, then try one of these in the same practice folder.
Use made-up content for every example. Read the result, compare it with the source and keep what you understand; those checks apply to each task. Use new output file names, and change the name in the prompt if one is already taken.
For research on your own files, make a notes folder inside first-local-page. Use your text editor to add three to five short text files with made-up reading or meeting notes. Ask for a summary that names the file behind each point, then check two claims against those files. Web research is outside this exercise.
Make todo.txt with a messy list of tasks for your fictional club. Ask for a one-page plan in a new plan.txt, then compare it with the list to check that no task was dropped.
A folder guide is another small task: ask for a short README-practice.txt that explains this practice folder. Read it beside the files, checking each file name and the steps for opening the page.
Write a short made-up club note in draft-original.txt. Ask for a tighter edit in draft-copy.txt and compare the two, checking that the meaning stayed the same and the original was left alone.
mkdir notesRun from the practice folder in Terminal. Then add three to five text files with your text editor.
Read only the text files in notes/. Summarize the main points. Name the file that supports each point. If files disagree, say so. Do not search the web, run shell commands or change files. I will check two claims against the named files myself.Open two named source files and find the passage behind each chosen claim.
Read todo.txt. Write a one-page plan to a new file called plan.txt. Keep every task from the list. Group related tasks and show the order you suggest. If plan.txt already exists, stop and ask me for a new name. Do not change todo.txt or any other files.Compare the plan with todo.txt and account for every task, including the small ones.
Read the files in this practice folder. Write a short README-practice.txt that explains what each file is for and how to open index.html. If README-practice.txt already exists, stop and ask me for a new name. Change no other files.Check each file name and instruction against what is actually in the folder.
Read draft-original.txt. Write a shorter, clearer version to a new file called draft-copy.txt. Keep the meaning and leave the original file unchanged. If draft-copy.txt already exists, stop and ask me for a new name. Change no other files.Compare both copies for changed meaning, and check that the original has not changed.
OpenCode is the main path here because Bridge1 labels its coverage end-to-end. If you chose Pi.dev: it has smoke coverage for one short turn. Pick it if you prefer a minimal client and accept that narrower check; the website exercise goes beyond it. The prompts and file checks below are the same for both clients; the marked Pi.dev notes explain what changes.
Most OpenCode permissions default to allow. When it does ask, read the command and the files it names before choosing once, always or reject. If you need an approval before every action, choose another path.
If you chose Pi.dev: Pi has no built-in limits on file, command, network or credential access; it runs with your user permissions. Use a fresh folder with made-up content, away from the files you need to keep.
The six setup steps below run on a Mac: get Bridge1, make a folder, save a Git checkpoint, install a client, load a model and start the client. Bridge1’s launcher is macOS only.
Use Get Bridge1 to install the app on your Mac. Choose a model from the model catalog and download it in Bridge1.
Bridge1 needs an Apple Silicon Mac with at least 24 GB of memory; 32 GB or more is recommended. Check the model’s window and memory labels on your own Mac before you download it, since the support minimum doesn’t mean every model fits.
Find your chosen model’s row in Bridge1’s catalog. The row below has Load and “Load + use for Route1”; you’ll use those buttons in Step 5.
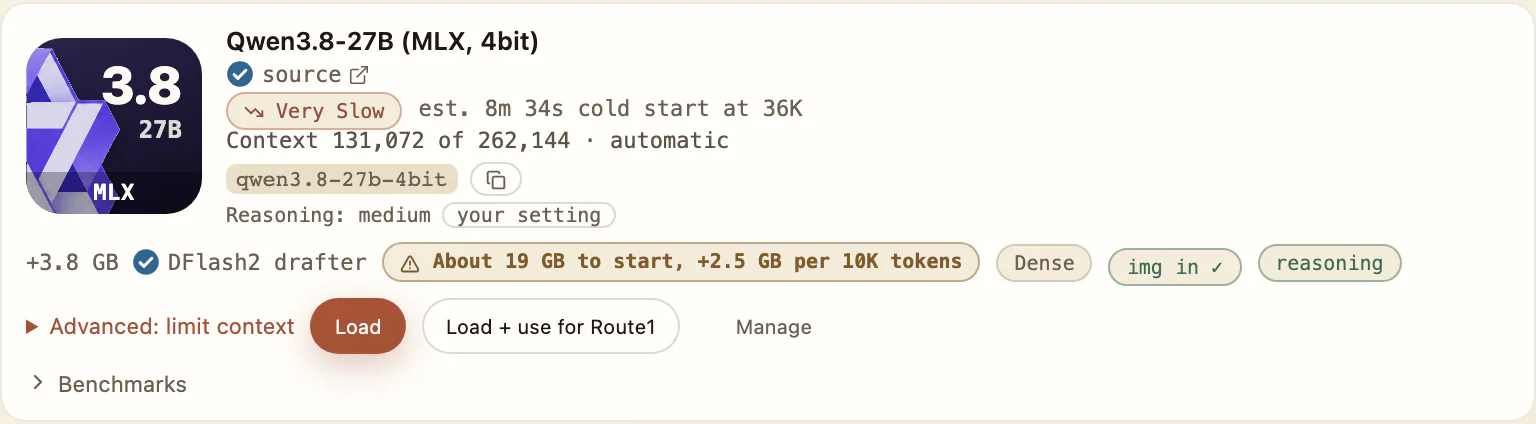
Swipe to see the whole row
Use the model name to find the matching row in your own catalog.
Open Terminal from Applications, then Utilities. Type one line at a time and press Return. These are shell commands, which tell your Mac what to do; the longer requests you’ll send to OpenCode later belong in the client instead.
Start with pwd to see which folder you’re in, then use ls to list its contents. The cd command changes folders; on its own, it takes you home. The last line uses mkdir to make an empty folder called first-local-page there. If that name is already taken, pick a fresh name and use it throughout the exercise.
Check the path before you edit. Running pwd yourself is how you check the current folder, rather than relying on a folder name in a chat reply.
pwd
ls
cd
mkdir first-local-pagePress Return after each line, and use the path you see to check where you are.
Enter first-local-page and run pwd again. Once the path looks right, start Git there: it records saved checkpoints, called commits, so you can compare changes and go back to work you’ve kept.
The commands below make README.txt with the words Practice page and save your first checkpoint. If Git asks for a name or email, finish that setup yourself without pasting personal details into the chat. Don’t start the editing exercise until you have that first checkpoint.
Git is a way to recover saved work, not a fence around the folder. Keep passwords, keys and other people’s data out of this practice project.
cd first-local-page
pwd
git init
printf 'Practice page\n' > README.txt
git add README.txt
git commit -m "Start practice folder"Run in Terminal after making the folder. Confirm the path before Git starts tracking files.
If OpenCode is already installed, check its version before running an installer again. The command below downloads a script from its official site and runs it on your Mac, so read the script before you decide to run it.
Run opencode --version. On 2026-10-30, OpenCode’s release page marks 1.19.5 as Latest, dated October 28, and lists 2.2.2 on October 29. Its notes say the official install script refuses to install 2.x, while Homebrew core now installs OpenCode 2.
OpenCode 2.x is not tested with Bridge1 yet: the launcher refuses it and points to the official script. If you installed with Homebrew, check your version first. After installing, open a new Terminal window and run opencode --version. The number it prints is the version of the copy that runs. If it starts with 2, treat that version as untested with Bridge1: repeat the install step or use the Gateway-tab route in troubleshooting.
If you chose Pi.dev: use the Pi install command instead. It also downloads and runs a script from the official site; read it before running it. You don’t need to install both clients.
The launcher was tested with OpenCode 1.19.4 and Pi.dev 1.4.0 on macOS on 2026-10-27. It refuses older versions and other majors, and may warn about newer ones. You don’t need the exact tested version; see the OpenCode setup guide and Pi.dev setup guide for the full rule.
curl -fsSL https://opencode.ai/install | bashOfficial OpenCode install command. It downloads and runs a script; read the script before running it.
curl -fsSL https://pi.dev/install.sh | shOfficial Pi install command. It downloads and runs a script; read the script before running it.
opencode --versionUse the result when following the version-refusal advice below.
In Bridge1, load your chosen model with Load or “Load + use for Route1”. Then run bridge1 models list in Terminal; this read-only command lists every model with a STATE column.
Find your model’s row and look for STATE to stop saying “not loaded”. If it still says “not loaded”, it isn’t ready yet.
bridge1 models listRun this after using a load button in Bridge1; it reads the model list.
From your practice folder in Terminal, run bridge1 launch opencode. The launcher supplies the Bridge1 connection for that session. Look for route1 and your practice folder in the start screen; Route1 follows the model you choose in Bridge1.
If you chose Pi.dev: run bridge1 launch pi instead. Look for route1 and the practice folder at the bottom of Pi’s screen. The launcher supplies its Bridge1 connection for the session too.
On a fresh machine, a first launch may pause for several seconds before OpenCode appears. Wait for its screen before you type a prompt.
If no model is loaded, the direct commands still start the client and show a card with the model marked “(not loaded)” and the gateway on this Mac only. They don’t load it themselves; with automatic loading on, the first request does, which can make the first reply slow. This first-request loading flow has not been checked live for either client.
To choose a model before the client opens, run the menu command below instead of a launcher command. Pick an installed model; if it isn’t loaded, the menu loads it and waits before starting the client.
bridge1 launch opencode
bridge1 launch piThese are alternatives. Run only the line for your chosen client, from the practice folder.
bridge1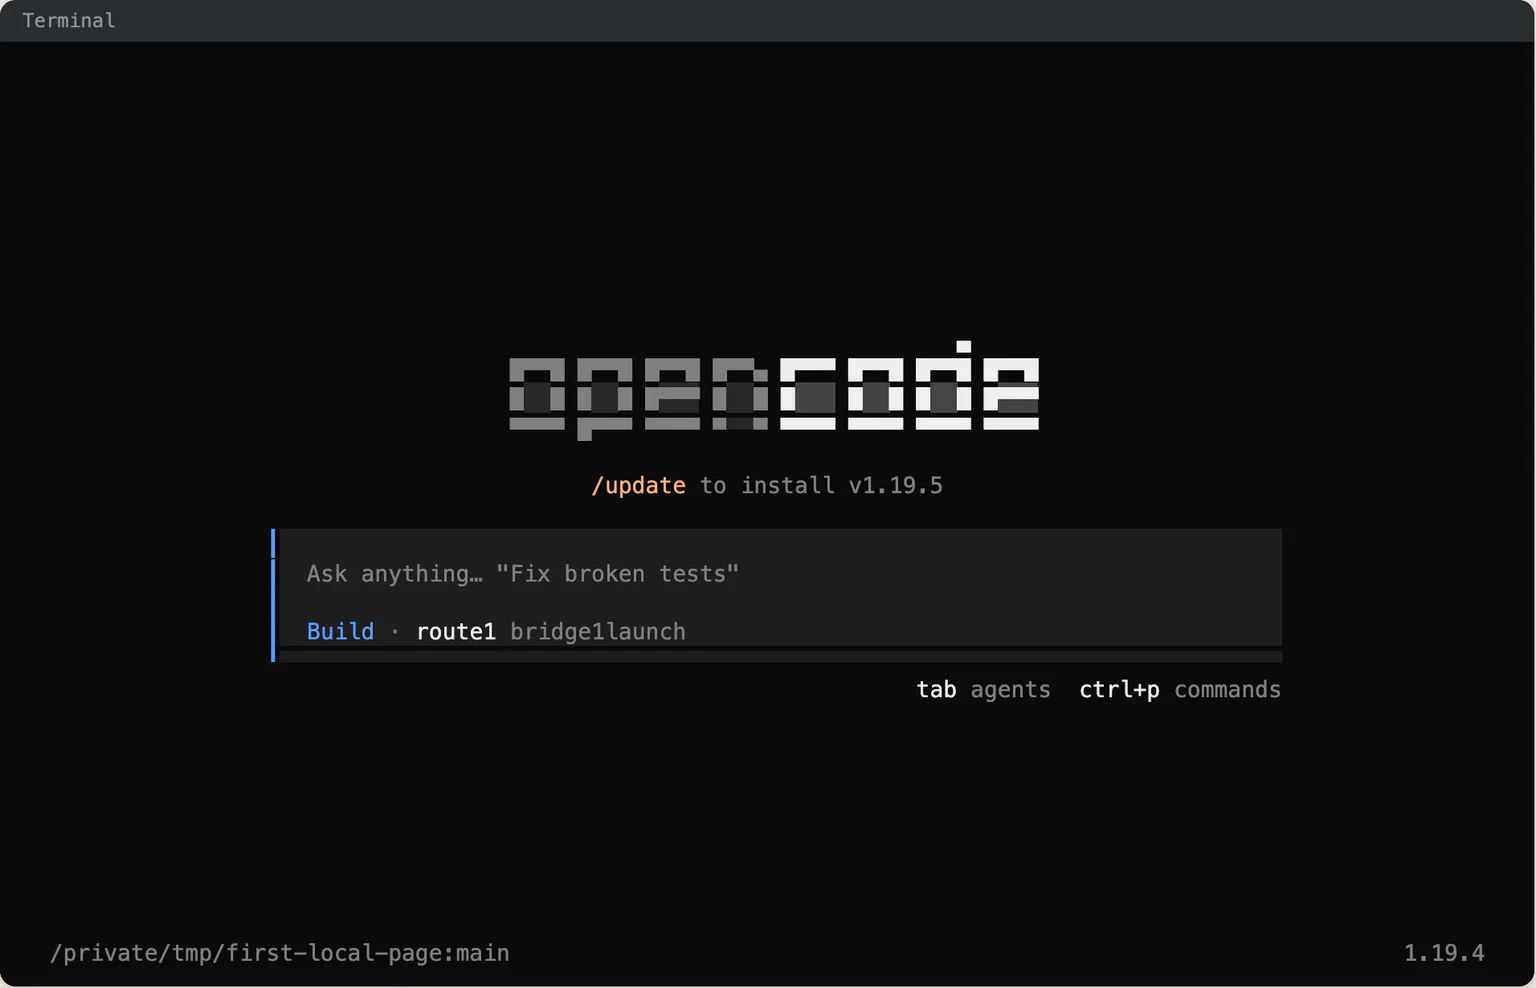
Swipe to see the whole screen
Look for route1 and your practice folder before sending a request.
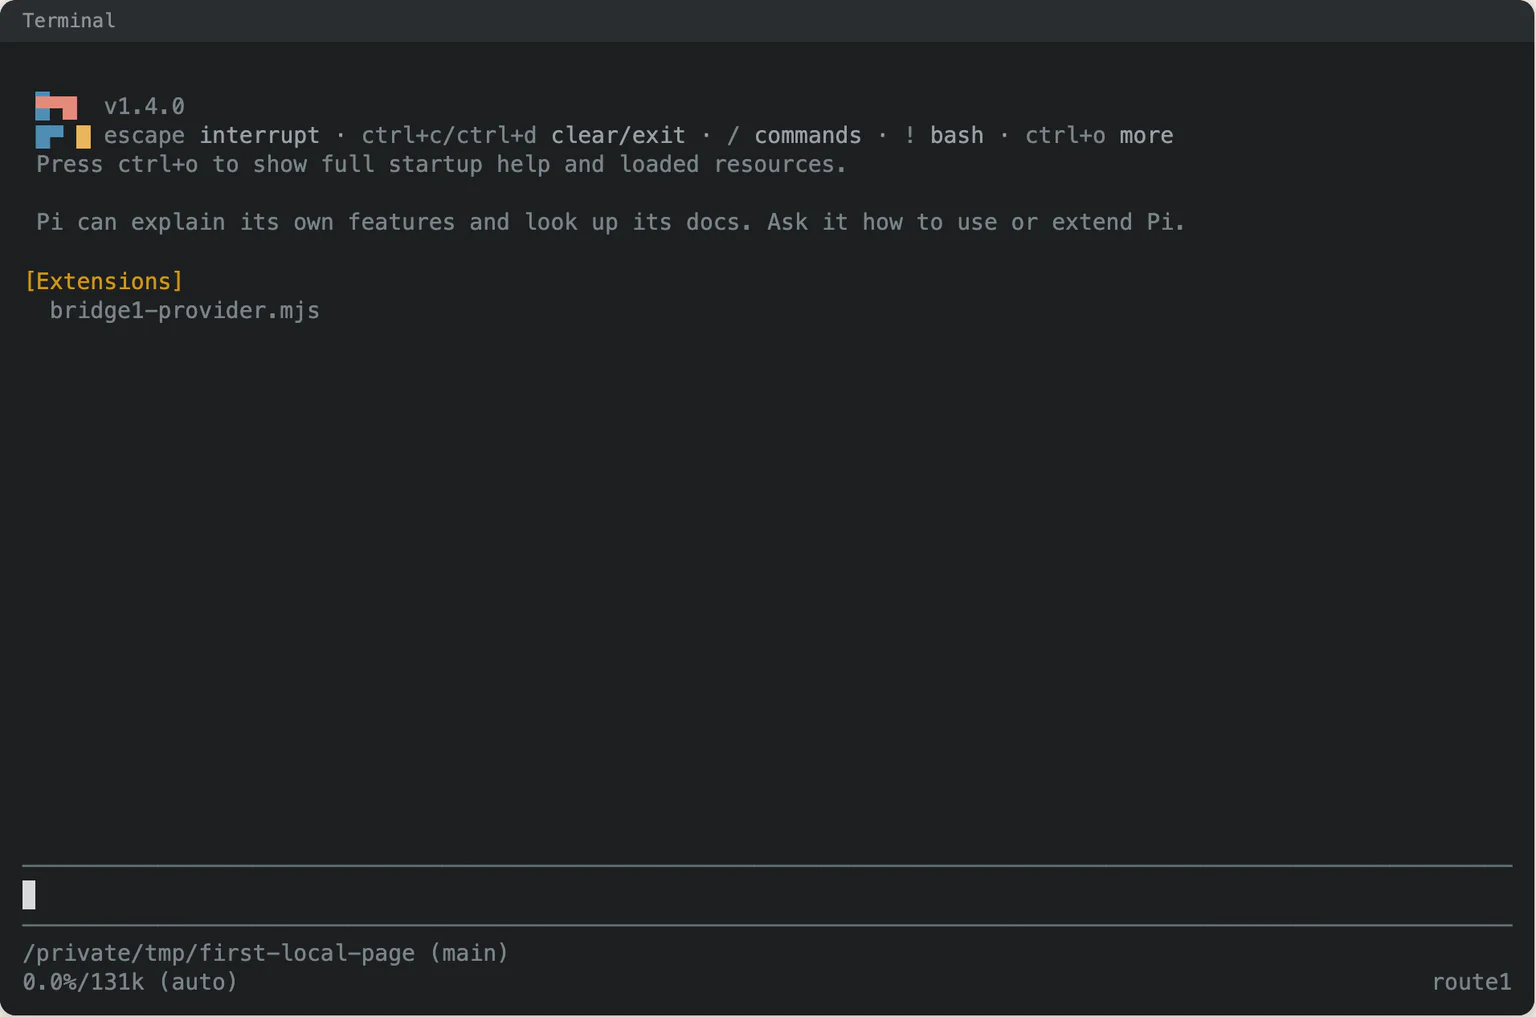
Swipe to see the whole screen
Match the folder at the bottom to the practice folder you made in Step 2.
Send the prompt below in OpenCode. Look for an answer that names README.txt and explains that it contains the words Practice page, rather than a general account of what a coding agent can do.
If it names another folder or uses a different model connection, stop and check the setup before you ask for an edit. Asking it to change nothing is a request, not a lock.
Explain what files you can see in this practice folder. Read README.txt and say what it contains. What actions can you take, and which would ask for permission? Change nothing. Do not run shell commands.Send this in the client after you have checked the current folder.
The page is for a made-up reading club called Quiet Pages. Keep it to one index.html file, with its CSS style rules inside, so you have one place to look when the page needs a change. Leave out forms, external libraries and images.
Ask for a plan first. In OpenCode, Plan suggests an approach and Build makes the changes; use Tab to switch when you’re ready. Look for a plan that names index.html and the welcome, reading and meeting sections before you send the build request.
Plan mode doesn’t block shell commands (checked on OpenCode 1.18.29); a client could still run one while discussing a plan.
If you chose Pi.dev: Pi leaves features such as plan mode and sub-agents to extensions and files. Ask for a plan in words with the same prompt, then send the build request once you’ve read it.
Now send the second prompt. Check for a saved index.html; a reply that only describes the page leaves you with nothing to open yet.
Plan a one-page website for a made-up reading club called Quiet Pages. Use one index.html file with inline CSS. Include a welcome, what we read and a meeting note. Use a calm, plain tone. No forms, external libraries or images. Explain your plan. Change nothing yet.Look for the welcome, reading and meeting sections before you approve the plan.
Create index.html for the Quiet Pages plan we just discussed. Keep the CSS inside that file. Use made-up content only. No forms, external libraries or images. Change no other files. Tell me what you changed so I can check the saved page myself.Send only after you accept the plan. Check that the named file was created.
Keep OpenCode open and use a second Terminal window for these checks. Use cd to enter the practice folder, check pwd, then run open index.html to open the saved page in your browser.
Look for the Quiet Pages heading and three sections: a welcome, what the club reads and a meeting note. There should be no broken pictures or links. Make the browser narrow too; can you still read the words without scrolling sideways?
Run git status to list changed and new files. A new index.html may not show up in git diff yet, because that command shows edits to files Git already tracks. Read the file, then use git add -N index.html to include its new lines in the next diff without saving a commit.
A diff shows added and removed lines. Match those lines to your request, then save a checkpoint only when you’re happy with the page.
cd
cd first-local-page
pwd
open index.htmlKeep the client open while you inspect the saved file in a separate window.
git status
git diff
git add -N index.html
git diffThe first status shows new files too. After you read index.html, add its intent to track so the last diff shows its new lines.
git add index.html
git commit -m "Save checked page"
git statusUse only after you accept the saved page. Repeat after each follow-up you choose to keep.
Try the color prompt first. Refresh the page and read the diff before asking for the new section; then check that section before trying the phone-layout prompt. Each block below is a separate request.
After each edit, repeat git status and git diff, and look at the saved page at a narrow width. If the result matches your request, save it before the next one. A color change should leave the club’s words alone.
To undo the last OpenCode change, use /undo: it removes the last message, its replies and related file changes. Use /redo only if you want them back. Both commands need Git.
If you chose Pi.dev: those slash commands are for OpenCode. Use the checkpoints you saved to compare and recover your practice files.
In index.html, use a pale cream background and dark text. Keep the text easy to read. Change only the colours. Leave the words and layout alone.First follow-up. Refresh the page and inspect the diff before continuing.
Add a short section called Bring a book to index.html. Use made-up text about sharing a favourite book. Keep the existing sections and style. Change no other files.Second follow-up. Check that the earlier content still appears.
Make index.html readable on a phone-sized screen. Keep the same words. Adjust spacing and text width so the page does not need sideways scrolling. Change no other files.Check that you can read each line without sideways scrolling.
/undo
/redoEnter these in OpenCode, not Terminal; both require a Git repository.
A context window is how much text the model can work with at once, counted in units called tokens. The chart reads the window labels for two models named in the OpenCode guide. Look at the memory label beside each window as well as the download size.
The catalog reference is an Apple M1 Max with a 32-core GPU and 64 GB of memory. Cold-start labels are app estimates. Task time and success for the practice exercises in this guide are not measured.
In a long OpenCode chat, a change to the prompt can mean reading earlier text again. These two examples show the model and chat size with the wait, so you can see the conditions behind each number.
When the start of a prompt changes, MLX models reread the chat once; the published example was about 100 s at 13K tokens on Qwen3.6-27B.
Switching between Plan and Build also rereads the chat once: 348 s at 98K tokens on Qwen3.6-35B.
Common scale: 0–262,144 tokens
Native window for these models: 262,144 tokens; Qwen3.6 35B-A3B · MLX: 229,376 tokens; Qwen3.6 27B · MLX: 114,688 tokens.
If the client is missing, follow the install or update steps the launcher prints. If a version is refused, check opencode --version, use the official script above, then open a new Terminal and try bridge1 launch opencode again. If it’s still refused, use the Bridge1 app’s Gateway tab for the setup steps; manual provider setup on OpenCode 2 is not tested. If you chose Pi.dev: follow the install or version guidance for Pi instead.
On a fresh machine, a first launch may pause for several seconds before OpenCode appears. Wait for its screen before sending a prompt.
If the screen is open but the reply is slow, check whether the model is ready in Bridge1 and whether automatic loading is on. Load it there if needed; for a long chat, read the prompt-reread examples above. Keep the next request small, and don’t treat a quiet window as proof that the task has failed.
If you asked for new colors but git status also lists README.txt as changed, stop before sending another request. Read git diff to see what happened to the starting file as well as the page, then use the undo step above if you’re in OpenCode. If you chose Pi.dev: compare the files with your last accepted checkpoint before keeping any more edits.
Check that the browser opened index.html from your practice folder, then refresh it. Name one fault you can see, such as text running off the narrow page, when you ask OpenCode for a fix. Read the next diff before you keep it.
Stop sending tasks. Read the command and inspect the files it affected before you try to repair anything. Keep valuable files out of the practice folder while you work out what happened, and return to the permission notes near the start if you need to reconsider your choice of client.
Ask OpenCode to explain a script or folder you didn’t write, using a disposable copy with no secrets. Ask it to read and explain only, and check its account against the files.
Standing instructions are optional. OpenCode’s /init guides you through creating or updating a project instructions file in the project root; put a few rules there for later tasks, such as keeping the page in one file. If you chose Pi.dev: it loads those instructions at startup from its user agent folder, parent folders and the current folder.
Use the OpenCode or Pi.dev setup guide linked below for the full connection and version rules. Compatibility shows the published test coverage when you want to check what’s covered before a new task.
Reference Mac: Apple M1 Max · 32-core GPU · 64 GB. Decode is engine-reported tokens per second; other Macs are not measured.
mxfp4 · editor's choice
Qwen3.6 35B-A3B
- Engine
- MLX
- Download
- 19.3 GB
- Admitted window
- 229,376 tokens
- Memory: measured or estimated
- 55.2 GB · estimated
- Measured depth and window estimate
- Measured to 131,443 tokens (39.1 GB peak, M1 Max 64 GB). The 229,376-token window is estimated at 55.2 GB.
- Short decode
- not measured
- Decode at depth
- not measured
- SWE-bench Verified (base weights)
- 73.4 creatorconditions not recorded
- Catalog date
- 2026-10-09
4-bit
Qwen3.6 27B
- Engine
- MLX
- Download
- 16.1 GB
- Admitted window
- 114,688 tokens
- Memory: measured or estimated
- 55.0 GB · estimated
- Short decode
- not measured
- Decode at depth
- not measured
- SWE-bench Verified (base weights)
- 77.2 creatorconditions not recorded
- Catalog date
- 2026-10-09